When it comes to achieving a peaceful and serene environment in your home or vehicle, one effective solution is to install sound deadening panels. These specialized panels are designed to absorb and reduce noise, providing a tranquil atmosphere away from the hustle and bustle of everyday life. Whether you are looking to minimize road noise in your car or eliminate unwanted sounds in your living space, sound deadening panels can be a game-changer.
In this guide, we will explore the essential steps for installing sound deadening panels to maximize noise reduction. Proper installation techniques can significantly enhance the effectiveness of these panels, transforming any noisy area into a quieter, more comfortable environment. We will cover the materials you need, the surface preparation required, and tips for achieving the best results.
By understanding the importance of sound proofing and following our detailed instructions, you can create a personal sanctuary where you can relax and focus without distractions. Join us as we delve into the art of sound deadening and unlock the full potential of these innovative panels to improve your quality of life.
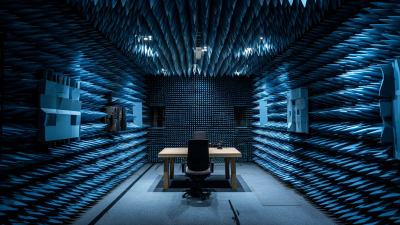
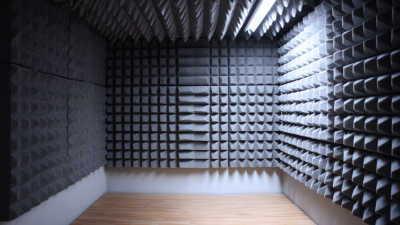
When it comes to choosing the right sound deadening panels for your needs, it’s essential to consider both the type of noise you aim to reduce and the specific environment in which the panels will be installed. According to a report by the Acoustic Society of America, noise reduction can be achieved through various materials that vary in density, thickness, and composition. For example, mass-loaded vinyl (MLV) is often recognized for its exceptional sound-blocking capabilities, while foam panels are great for reducing echo and improving acoustics in a room. Understanding the nature of the sound—whether it's airborne or impact noise—will also guide your selection process and ensure optimal results.
Tips: To maximize the effectiveness of sound deadening panels, consider the installation location carefully. Areas such as basements or home theaters may require thicker materials to withstand lower frequencies, while lighter panels can suffice in spaces with higher frequency noise, such as bedrooms or offices. Additionally, always check for the panel’s Sound Transmission Class (STC) rating; higher ratings indicate better noise-blocking performance.
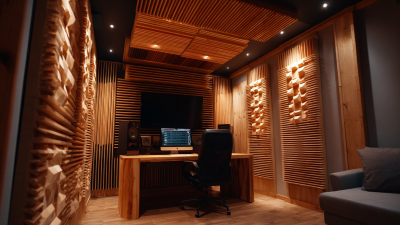
Ultimately, choosing the right sound deadening panels requires a balance between functionality and aesthetics. Many panels come in various colors and styles, allowing you to blend them seamlessly into your interior design while still benefiting from their noise-reduction properties. Investing time in selecting the appropriate panels will not only enhance your space’s auditory comfort but also contribute to a more peaceful living or working environment.
Preparing the surface before installing sound deadening panels is a crucial step that can significantly enhance the effectiveness of noise reduction. According to a report by the Acoustical Society of America, proper surface preparation can improve the performance of sound deadening materials by up to 30%. This involves cleaning the area thoroughly to remove any dust, grease, or residue that could interfere with adhesion. A degreasing agent or isopropyl alcohol can be effective for this purpose, ensuring that the surface is smooth and ready for application.
In addition to cleaning, inspecting the surface for any structural issues is essential. Any dents, holes, or surface irregularities should be repaired to provide a flat and uniform layer for the sound deadening panels. The Noise Control Engineering Journal highlights that sound waves can leak through even small imperfections, reducing the effectiveness of soundproofing solutions. Moreover, ambient temperature and humidity levels should be considered, as they can impact the adhesive properties of the sound deadening materials. Ensuring that the working environment is neither too cold nor too humid can help achieve a better bond, ultimately maximizing the noise reduction potential of the installation.
Installing sound deadening panels can significantly reduce noise levels in your space, creating a more serene environment.
To start, gather the necessary tools and materials, including the sound deadening panels, a utility knife, adhesive, a roller or a flat tool, and possibly a measuring tape.
Begin by preparing the surface where the panels will be applied. This involves cleaning the area to remove dust and debris, which ensures that the adhesive will bond effectively with the panels.
Once the surface is ready, carefully measure and cut the sound deadening panels to fit the specific areas you wish to treat.
Apply the adhesive to the back of each panel, ensuring an even coverage to prevent any air pockets.
Firmly press the panel onto the prepared surface, using a roller or flat tool to secure it in place and eliminate any remaining air bubbles.
Repeat this process, making sure the panels are aligned correctly, until you have covered the entire area.
After installation, allow sufficient time for the adhesive to cure as recommended, ensuring optimal performance of your sound deadening solution.
To achieve optimal noise reduction when installing sound deadening panels,
special attention must be given to sealing edges and joints. Gaps and spaces between panels can significantly
undermine the effectiveness of any soundproofing effort. Therefore, it is crucial to use
high-quality sealants or acoustic caulk to fill these openings.
Applying a generous amount of sealant ensures a tight fit between panels, thus preventing sound waves from leaking through.
Furthermore, when positioning the panels, start from one corner of the area and work your way across,
ensuring that each panel fits snugly against its neighbors. For optimal results, you should consider overlapping
the edges of the panels slightly or using a staggered installation pattern. This technique not only enhances
visual appeal but also minimizes the chances of sound transmission through seams. If possible, use a roller to
press down the panels after installation, ensuring that the sealant fully adheres and eliminating any air pockets
that could compromise sound insulation. Properly sealed edges and joints are paramount for creating a serene environment, maximizing the overall effectiveness of your
sound deadening solution.
To achieve optimal performance from sound deadening panels, regular maintenance is crucial. According to a report by the Acoustical Society of America, improper installation and neglect can reduce the effectiveness of soundproofing materials by up to 50%. Therefore, routine checks for wear and tear, especially in areas exposed to moisture or high temperature fluctuations, can significantly extend the life of your sound deadening installations. Inspect for any gaps or separations as these can compromise sound isolation and allow unwanted noise to penetrate.
In addition to physical inspections, keeping the installation environment controlled contributes to the longevity of sound deadening performance. The National Acoustics Laboratory recommends maintaining low humidity levels, ideally below 60%, to prevent material degradation. Furthermore, applying a protective topcoat can enhance durability against environmental factors. Understanding these maintenance tips not only helps in sustaining the sound deadening efficiency but also aligns with findings from the International Journal of Acoustics and Vibration, which highlighted that well-maintained panels can last more than 15 years without significant performance loss. Regular upkeep ensures your investment yields maximum noise reduction benefits for years to come.